


တယ္..အဂၤလိပ္ဘာသာျဖင့္ အရိုးရွင္းအလြယ္ကူဆံုးေရးသားထားတဲ့အတြက္ လူတိုင္းလုပ္တတ္ၾကမွာပါ
ပံုေတြနဲ႕တစ္ကြေသခ်ာရွင္းျပထားပါတယ္..ဒီနည္းလမ္းကို ေရးသားေပးပို႕လာသူ ျပည္ပေရာက္ ကၽြန္ေတာ့္
ရဲ႕အစ္ကိုလို ခင္မင္ေလးစားရတဲ့ အစ္ကိုေအာင္မ်ိဳးေက်ာ္ကိုလည္း ဒီပိုစ့္ ဒီေနရာေလးမွတစ္ဆင့္ေက်းဇူး
အထူးပင္တင္ရွိပါသည္ခင္မ်ာ။1.For Windows XP
1. Open up Control Panel from the start menu and head to Network Connections

2. Double Click the Wireless adapter from the networks list, then go to Wireless Networks tab then click Add

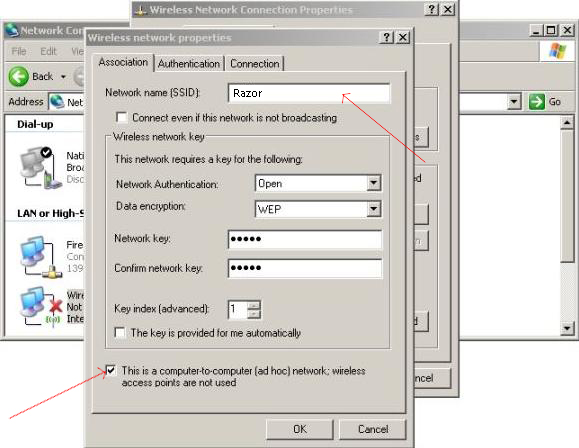
3. Enter the SSID (name) of the network, this will appear when scanning for it, and set the security Key you want then check the last checkbox (Ad-hoc) finally click OK
4. Finally go back to network adapters, double click the Internet connection adapter (Local network) then go to Advanced tab, check the box that says "Allow other network users to connect through this computer's internet connection" and select the Wireless adapter from the list then hit OK

2. Windows Vista and 7
1. Enter the Control Panel from the Start menu, then head to Network and Sharing Center

2. Click Setup a new connection or network link

3. Scroll down and click Setup a Wireless ad-hoc

4. Enter the details of your WiFi hotspot : Appearing Name (SSID), Security Type and Password (Key) then click Next

5. Finally activate the internet sharing by click the button "Turn On Internet connection sharing"
Note: If you
can't find the option 'Turn On internet connection sharing' then go to
the Local Network Adapter > Right Click > Properties > Sharing
> Check the box 'Allow other network users to connect through this computer's internet connection'

3. For Windows 8
To create a WiFi Hotspot in Windows 8 you need to perform some cmd
commands in order to activate the hotspot and turn your computer into
modem internet sharer. Here are the commands used in step by step:
1. Search for CMD then click Run as Administrator to run the command prompt with administrator privileges

2. Run the following commands one by one:
netsh wlan set hostednetwork mode=allow ssid=razor-tuts key=password
Note: Change razor-tuts to the SSID (name) of your wifi and password to the key you want to use.
netsh wlan start hostednetwork
netsh wlan show hostednetwork
3. The last command with "show" parameter will show you if the network
was created successfully or not, here's an example of what it outputs:

4. Done! You just created a WiFi hotspot, now search for it using your
iPhone, iPad, Android device or another Computer equipped with a
Wireless adapter.
Written By Mr.Aung Myo Kyaw


0 comments:
Post a Comment